With an Azure Resource Manager (ARM) template, you can create a specific infrastructure on Azure with the click of a button. The template defines the infrastructure as code and Azure is thereby told the target state of the resources. I have created such a template and published it via Github. The ARM template deployment includes a hub and spoke network topology with a central Azure bastion for secure access to VMs. This post shows you step by step how to use the template for yourself.
Note: As an alternative to the step-by-step instructions, you can also watch the following video.
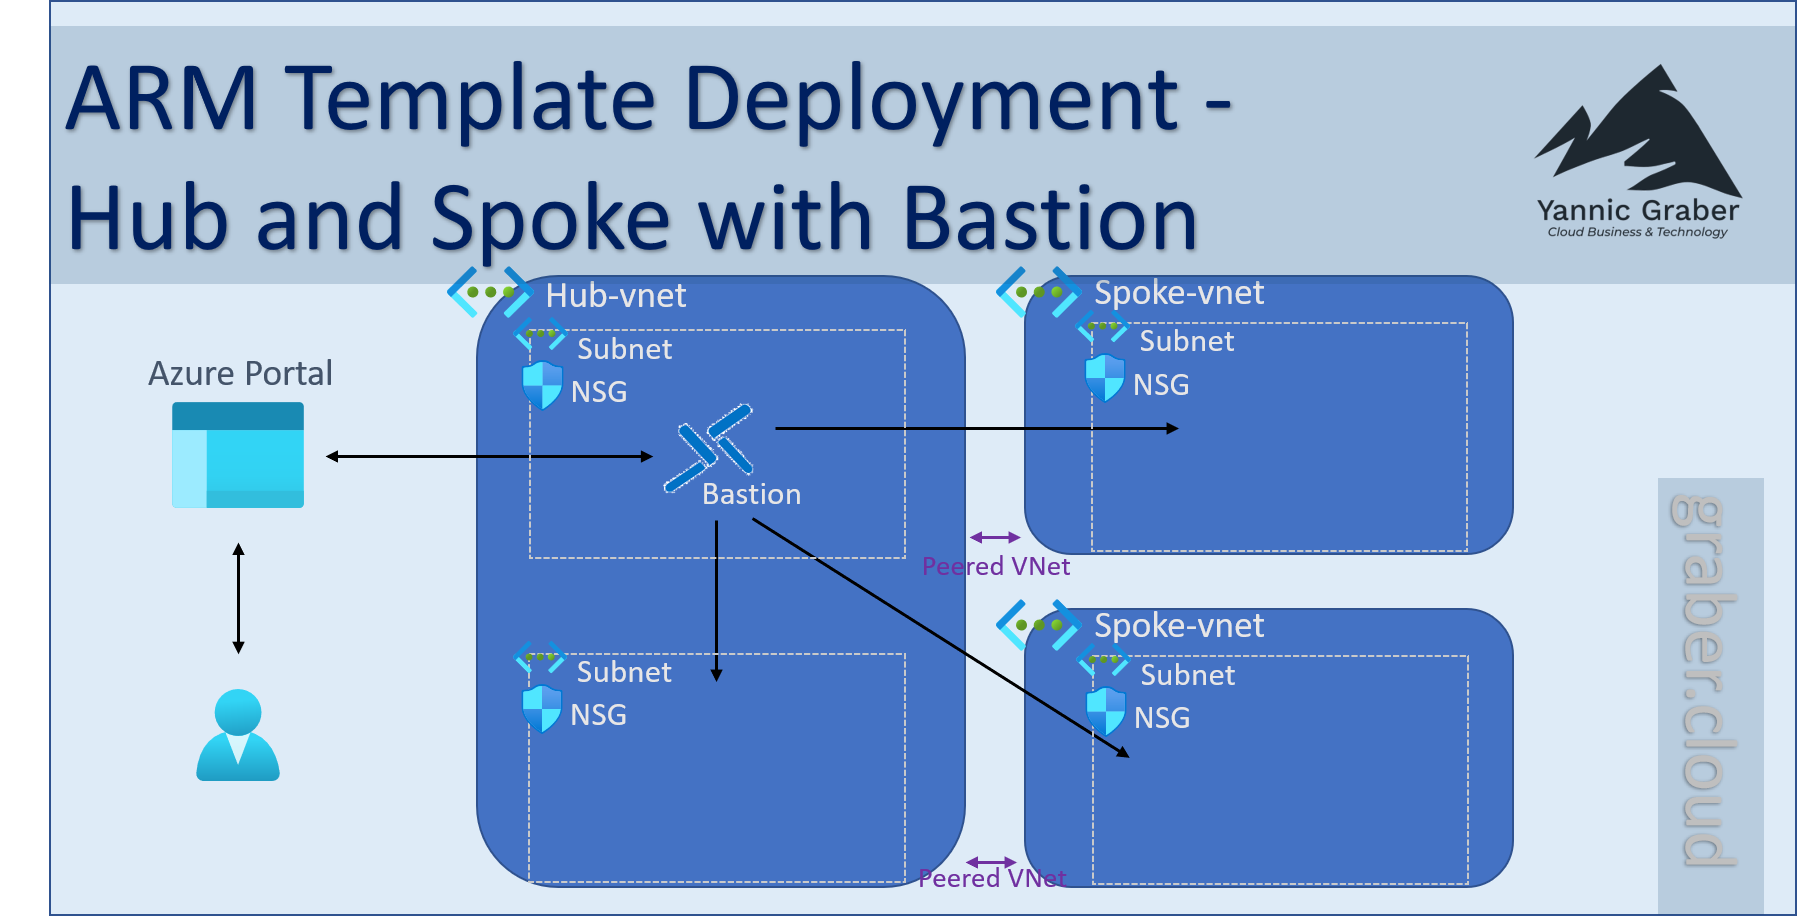
Overview of the Hub and Spoke with Bastion ARM Template
The template creates three networks. The Hub and two Spoke networks.
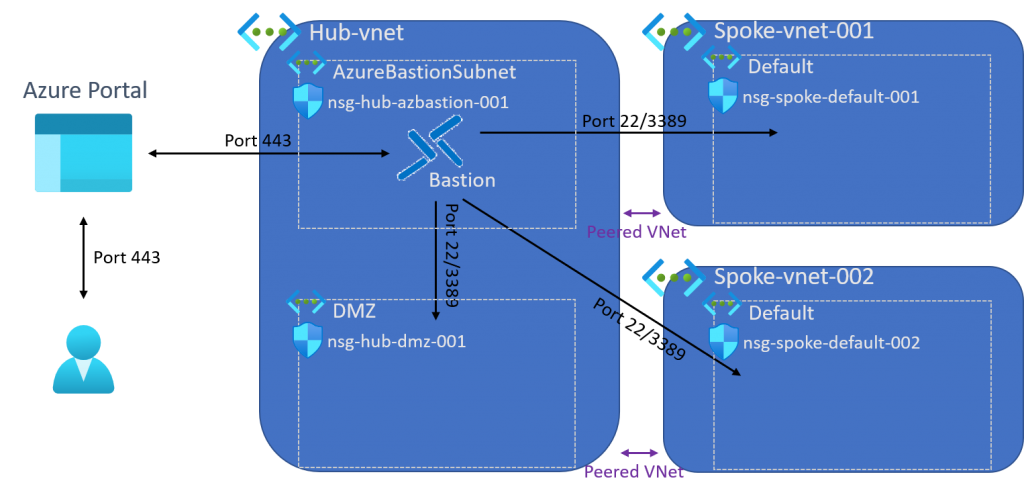
Hub network with bastion
The hub network forms the core of the network, which is populated with two subnets. One subnet remains empty for the time being and can serve you as a DMZ. The other subnet contains the central Azure Bastion, which is used for secure access to all your VMs. Both subnets have their own Network Security Group (NSG). This ensures that you can easily and flexibly adjust the rule base to your liking later on without affecting another subnet.
Spoke networks
Das Template erstellt zwei Spoke-Netzwerke , in der Grafik zu sehen als Spoke-vnet-001 und Spoke-vnet-002. Beide Spokes beinhalte je ein einziges Subnet. Diese beiden Subnetze kannst du für deine Workloads verwenden, die du im jeweiligen Netzwerk platzieren möchtest. Auch bei den Spoke-Netzwerken erhält jedes Subnet ihre eigene NSG um möglichst flexibel bleiben zu können.
Network peering
As soon as all three networks are created, the ARM template automatically connects them with each other (so-called network peering). Such peering always takes place between two networks. It is therefore a 1-to-1 connection. The two spoke networks are connected to the hub network in this deployment, but not the spoke networks to each other. This means that the spoke networks are separated from each other and cannot see each other. This is therefore a kind of star topology. If you want to allow communication between the two spoke networks, you can set this up manually later by routing using a Network Virtual Appliance (NVA).
ARM template deployment
You can find the ARM template I created on this link on Github at your free use. You are welcome to use the template, whether for tests or production. Before you do so, however, check the template thoroughly. Any guarantee is excluded on my part. Please be aware that the template may have changed since the publication of this article. You may clone the template without further permission and adapt it to your liking.
First navigate to the template on Github. You will find a button "Deploy to Azure" in the Readme.md. Select this button and log in with your Azure account. The following ARM template form appears. You must change the default values marked yellow in the print screen. This is on purpose, so that you have to deal with the naming convention. All other values do not have to be changed. However, I recommend that you also check them carefully. In the following subchapters, I describe each form item and what it does during deployment. If possible, use only lower case letters in the form to avoid errors during deployment.
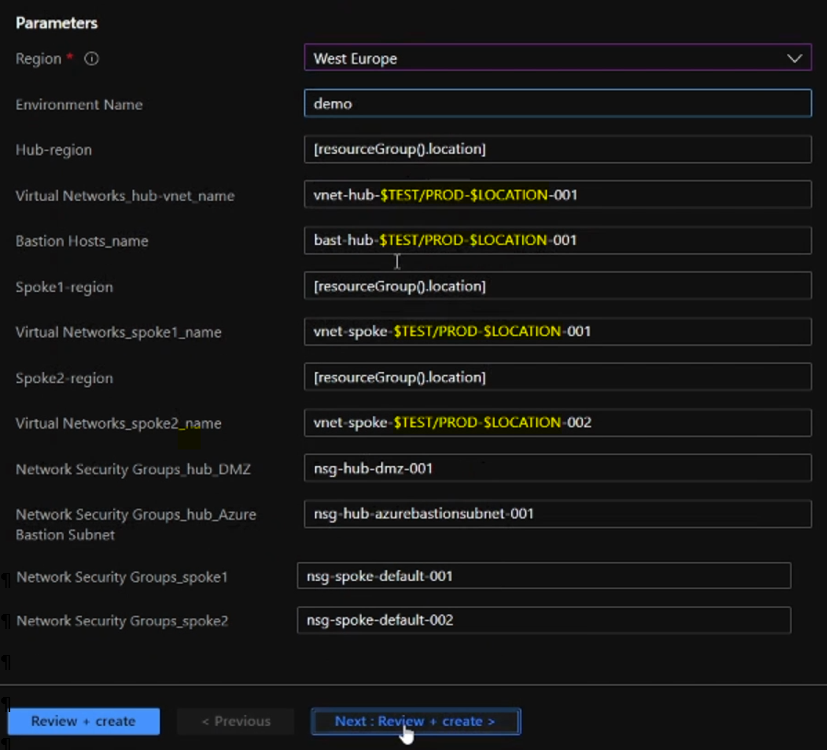
Region
Select the region in which you want to create your resource group. In this example, "West Europe". You should also enter the chosen region in the other parameters, taking into account your chosen naming convention.
Environment Name
Here you can define the name of your environment. This parameter is only used for names of certain resources that cannot be defined here by parameter. Typical names or abbreviations for environments are "demo", "test", "dev", "int" or "prod". Make sure that you also include the chosen environment name in the naming of the other parameters.
Hub region
You can create the networks in different Azure regions without any problems. With this parameter you define in which region the hub network is created. Normally, you want to create the hub network in the same region as the resource group. In this case you can leave the function or the default value and continue. Alternatively, you can define the region explicitly, for example "West Europe", "North Europe", etc.
Virtual Networks hub vnet name
Define the desired name of your hub network here. This is the first parameter that must be adjusted. Replace the yellow part "$TEST/PROD-$LOCATION" with the values of "Environment Name" and a defined short form of the region. As an example: "vnet-hub-test-euw-001".
Bastion Hosts name
Next, define the name of the bastion host. Here, too, editing the default value is mandatory (yellow marking).
Beispiel: «bast-hub-test-euw-001»
Spoke 1 region
This parameter does not necessarily have to be adjusted. The same applies as for the parameter "Hub region". If the spoke network 1 is to be created in a different region than the resource group, define it here. Often, however, the spoke network is desired in the same region. In this case, simply keep the default value.
Virtual Networks spoke 1 name
Next, define the name of the spoke network 1. The same applies to this parameter as to the parameter "Virtual Networks hub vnet name".
Example: "vnet-spoke-test-euw-001".
Spoke 2 region
The same applies to this parameter as to "Spoke 1 region". Only change the parameter if you do not want to create the spoke network 2 in the same region as the resource group. With the following example, the spoke network 2 is created in northern Europe and thus in a different region.
Example: "north europe".
Virtual Networks spoke 2 name
Define the name of the spoke network 2 using this parameter. Watch out for copy-paste errors if the spoke network 2 was created in a different region. Check the name for the correct region.
Example: "vnet-spoke-test-eun-001".
Network Security Groups Parameters
Finally, the four parameters for the Network Security Groups. You do not need to adjust the parameters "Network Security Groups hub DMZ", "...Azure Bastion Subnet", "...Spoke1" and "...Spoke2", as they do not contain any variables. They define the name of the NSGs that are attached to the corresponding subnet. However, check the default values anyway to see if you are satisfied with the naming and if they fit into your concept.
Check and create the environment
Once you have understood the template, checked all the parameters and adjusted them where necessary, you can create all the resources mentioned with a few clicks. Select the button "Review + create". Check all your details one last time before you actually commission the deployment by clicking on the "Create" button. As a result, after a few minutes your hub and spoke network with central Azure bastion will be ready for your use, which you have successfully created using the ARM template.