
You can create resources very easily on the Azure platform. This is great, but it also provides a few risks. For example, you can delete resources or entire environments just as easily. What is very helpful for tests and demos can be very dangerous for integration and production environments. So you don't have to manage this manually, I wrote an Azure Policy code. This defines the automatic auditing and provisioning of Azure Resource Locks with Azure Policies.
If you want to learn more about Azure Resource Lock and its benefits first, I recommend the following short video of mine (sound on).
Step-by-step – automation via Azure Policies
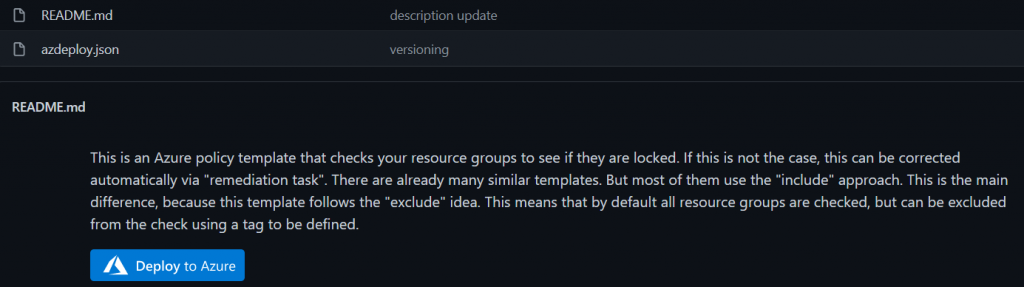
Since I provide the code on my public GitHub repository already finished, an automation is conceivably simple. First you open GitHub with the following link.
Select the "Deploy to Azure" button and log in to the Azure portal with the appropriate account.
A form appears in which you only have to select the desired subscription on which you want to save the policy definition. The other fields are all already filled with a default value. Among other things, you also create a new policy category called "Governance", in which you then place the definition. If you prefer to use a different name or an existing category, you can easily customize that. You can change all default values to your liking. The field "Role Definition" has to be kept with "Owner". Then click on "Save".
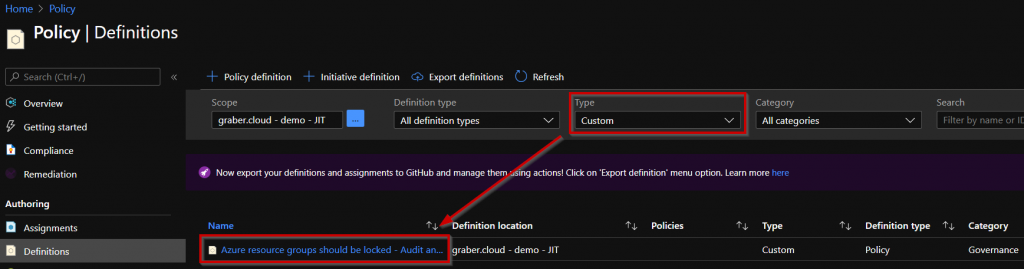
You have successfully created the policy and can find it in "Policy" under "Definitions". To find it quickly, simply select the filter "Custom" under "Type".
Click on the policy and select "Assign" to apply the created policy. A form will appear, which you should leave with the default values. If desired, you can add a description. Then select "Next" to get to the parameters. Here you need to make a decision. The policy behaves in such a way that it creates a lock on all resource groups by default. The only exceptions are resource groups that have a certain "tag value". So you have to define here in which tag you want to search for which value for the exclusion. The fields already contain a default value as a suggestion from me, which you can take over.
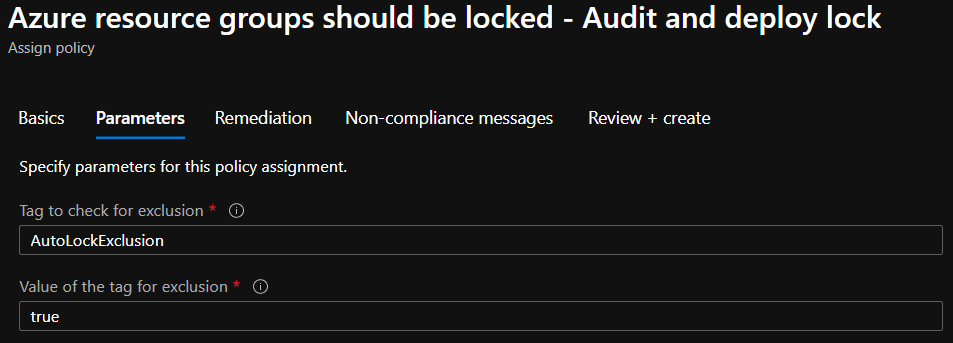
- I intentionally work with the exclusion method to increase security. If it were the other way around and the setting of the tag was forgotten during a deployment, the resource group and the resources it contains would not be protected.
- Make sure that you have already set the exclusion tag for the resource groups to be excluded before you continue. Otherwise, you will need to manually remove the lock from them later on.
Once you have decided on a tag and its value, select "Next" to continue.
Now a "remediation task" has to be created. This task ensures that the existing resource groups are not only checked, but also that a lock is automatically created. This is therefore more or less the main point of the whole thing. For the "remediation task" Azure creates a "managed identity", which as "owner" can then automatically create the lock for you. So check the box "Create a remediation task" and then select the Azure region in which you want to create the managed identity.

Now select "Review + create" to create and assign the policy based on the definition. Now you need some patience until the policy has performed the first check and created the necessary locks automatically. You can check the status under "Overview" of the policies.
Validation - Automatically audit and deploy Azure Resource Locks
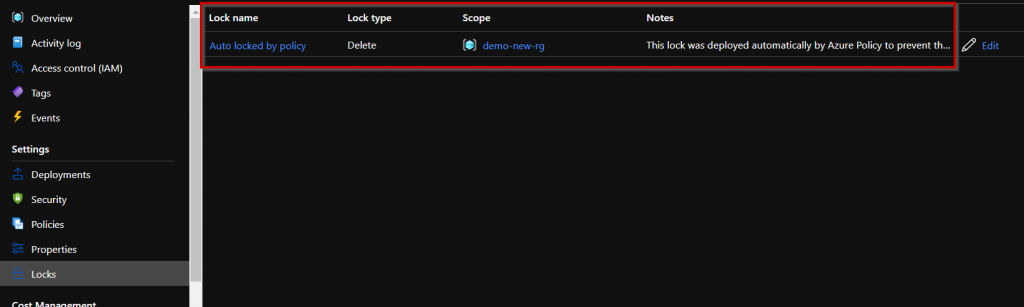
After a while the first check of the resource groups should be done and they should be protected by the remediation task. Now check the properties of the resource group to see if you can find the new lock where you want it and if the tagged resource groups remain unaffected by the remediation task.
Expected outcome of the resource groups (RGs):
- A lock was created for existing RGs WITHOUT tag.
- Existing RGs WITH tag were filtered and therefore NO lock was created.
- Newly created RGs are checked directly by the policy when they are created and
- ...WITHOUT tag, they are also provided with a lock.
- ...WITH tag, they are filtered and therefore NO lock is created.
Congratulations! You have successfully automated the auditing and provisioning of Azure Resource Locks with Azure Policies!

Not working, im getting an error when I run the deploy to azure.
The policy effect ‹details› property could not be parsed using mode ‹All›.
Hello EFD
Thank you for your feedback, much appreciated. I just tested it myself again today, and it works perfectly fine for me on my test environment. Was it a temporary issue and it might work by now again? Have you checked?
Best,
Yannic
Thanks for this blog. I came across with a scenario where after applying this automatic policy, What if someone manually removed the resource lock. How we can ensure that even if someone is removing Azure policy should reapply again. Could you please help with that?
Hello.
Thanks for this very convenient policy.
So I got into «exclusion pitfall». Regularly I use Azure menu for exclusion AFTER applying policy.
By the way it doesn’t matter what kind of the policy I use. Here it is different behavior.
I cant exclude AFTER. Yes, I’ve read an warning, but I think I should be more elastic. Because cloud infrastructure is not static at all. Manual deletion maybe problematic. And this policy doesn’t make a force process. I mean – if someone with high permission deletes the Lock, it is gone until you MANUALLY create a Remediation Task. I’ve been searching for the automatic deployment for a long time and unsuccessfully. Maybe this strange behavior «by design» of Azure?
Good script! Don’t know why Microsoft doesn’t have this as a built-in script.
The policy works on subscription / resource group level. Is there a way to modify it so that it works on a resource level? e.g. if I want to exclude a lock being created on a disk/snapshot, but on every other resource in the resource group, I want it.
I put the exclusion tag and value (I put «True», not «true», does that make a difference?) but the policy assigned the delete lock.
Hello Randy and thank you for your comment.
You’re right, the policy is built for resource groups and will then inherit to all the resources within. In case you want to change that, you have to rewrite the policy rule part «policyRule». Instead of
«equals»: «Microsoft.Resources/subscriptions/resourceGroups»
you could also try to inlcude all resources and exclude resourceGroups instead. Or keep all included and rewrite the policy that it will only be applied to resources without the exclusion tag.
we currently deploy locks via runbooks but I’m looking at doing it via policy instead. Our standard is to call the locks we create for each RG
lck-resource group name
it looks like this in PS in the runbook
$lockcheck = Get-AzureRMResourceLock -ResourceGroupName $resourcegroup.ResourceGroupName
If ($lockcheck -eq $null)
{
New-AzureRMResourceLock -LockLevel CanNotDelete -LockName «lck-$($resourcegroup.ResourceGroupName)» -ResourceGroupName $resourcegroup.ResourceGroupName -force
how do we go about doing the same rather than just a generic Auto locked by policy, can you pass variables in to the «name» value?
«resources»: [
{
«name»: «Auto locked by policy»,
«type»: «Microsoft.Authorization/locks»,
«apiVersion»: «2017-04-01»,
«properties»: {
«level»: «CanNotDelete»,
«notes»: «This lock was deployed automatically by Azure Policy to prevent the resource group and its containing resources from accidental deletion.»
Hello Kerry
Thank you for your message. Yes, you can achieve that also with Azure Policy, if you use «Concat» for example.
In your example it would be something like….
"name": "[concat('lck-', parameters('resourceGroupName'))]",Hope this does help you.
Thank you sir…
You are more than welcome!