

As the business world becomes increasingly mobile, cloud services are becoming even more attractive. But what if, as is often the case, there are still dependencies on an enterprise network - on Azure, for example? The solution is obvious: a point-to-site VPN ensures communication for mobile workers. In this how-to post, I discuss how a certificate-based point-to-site VPN to an Azure VPN gateway can be automatically rolled out to mobile clients through Intune. I also discuss how certificates can be automatically issued and renewed by a Certificate Authority in combination with Intune.
Solution architecture and involved components
Various components are required for the successful and automated rollout of the point-to-site VPN configuration. The following diagram shows the solution architecture and which components are necessary for a successful configuration.
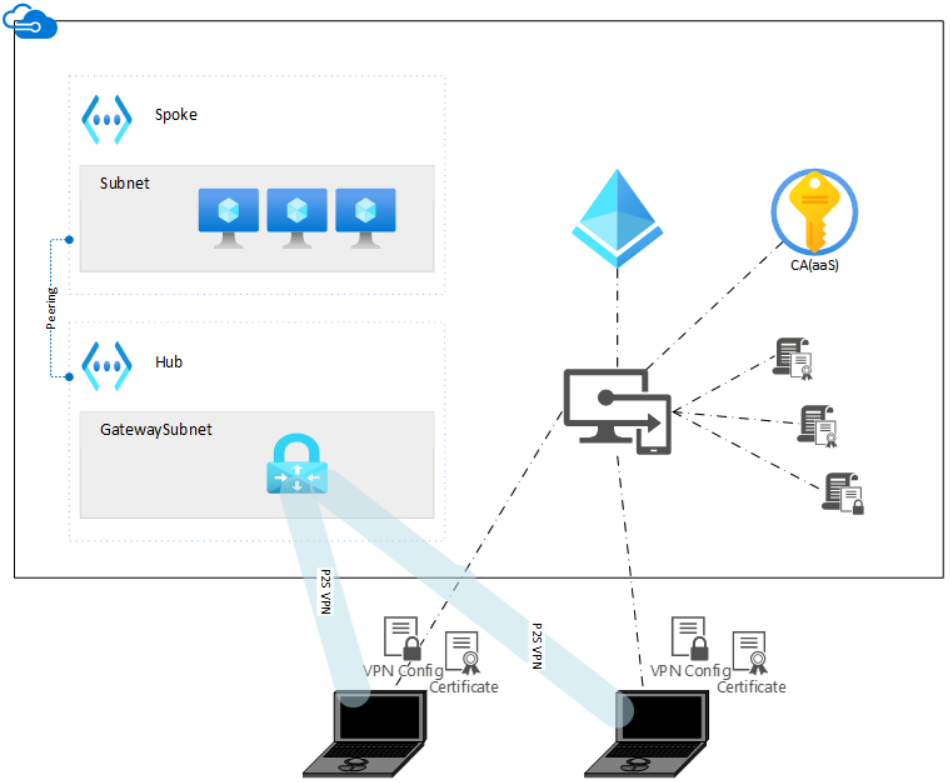
In this scheme, two mobile devices are present at a non-specific location (remote workers). Intune manages the issuance of certificates via Certificate Authority (CA) and distributes them to the clients, as well as the VPN configuration profile. Equipped with the certificates and the VPN configuration, the clients can communicate with the enterprise network on Azure via the point-to-site VPN.
Initial situation and prerequisites
You can use these instructions to build the environment yourself. As a starting point, it is assumed that the Azure network you want to access via P2S VPN is already configured. In my example, I chose a hub and spoke topology, according to best practice. How you can quickly and easily create such a topology yourself can be found in my post "ARM Template Deployment - Hub and Spoke with Bastion".
In addition, a CA is of central importance for issuing and verifying certificates via SCEP. Again, I assume that you already have one in your environment. If not, you have to create one.
Note: You can create a CA the classic way, or get it as an out-of-the-box solution (as a service / CAaaS). I chose a solution that stores the certificates in an Azure Key Vault, as shown in the diagram (CAaaS with Key Vault).
Azure VPN Gateway
If not available, first create a VPN gateway on Azure. Navigate on Azure to "Virtual network gateways" and click on "Create". Then select the radio button "VPN" for "Gateway type" and the existing hub network for "Virtual network". Check all settings if they meet your requirements and then click on "Review + create".
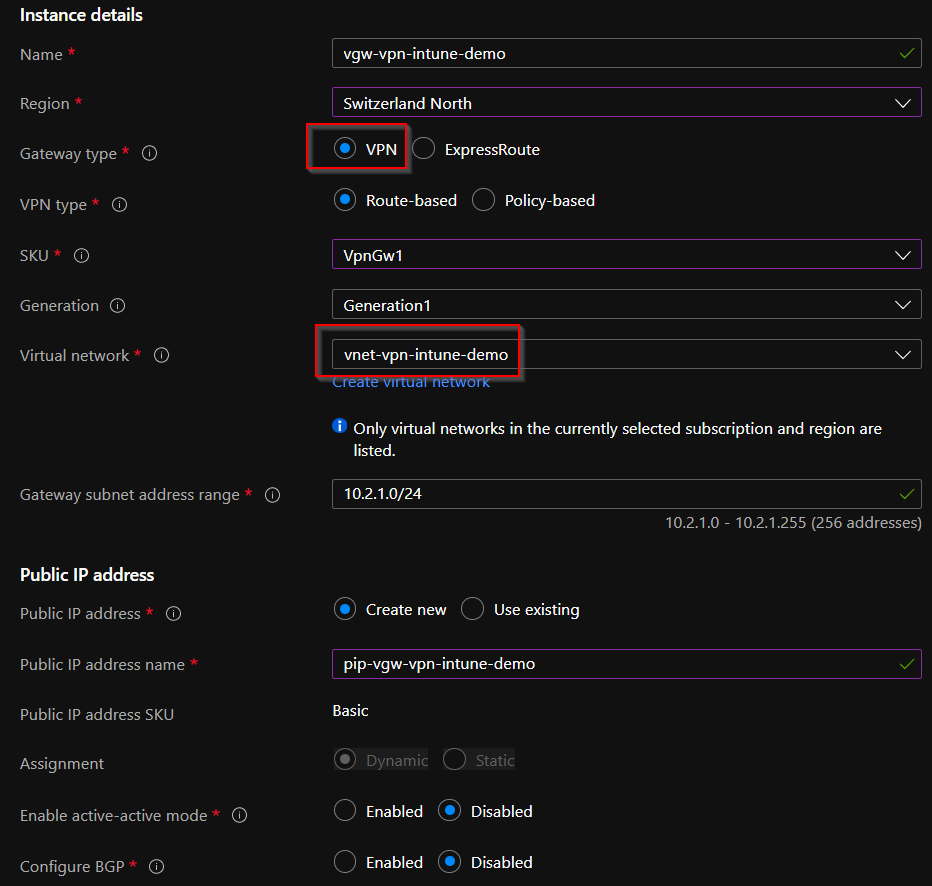
Creating the gateway will then take about 45 minutes, but you can already proceed to the next steps.
Azure AD Group
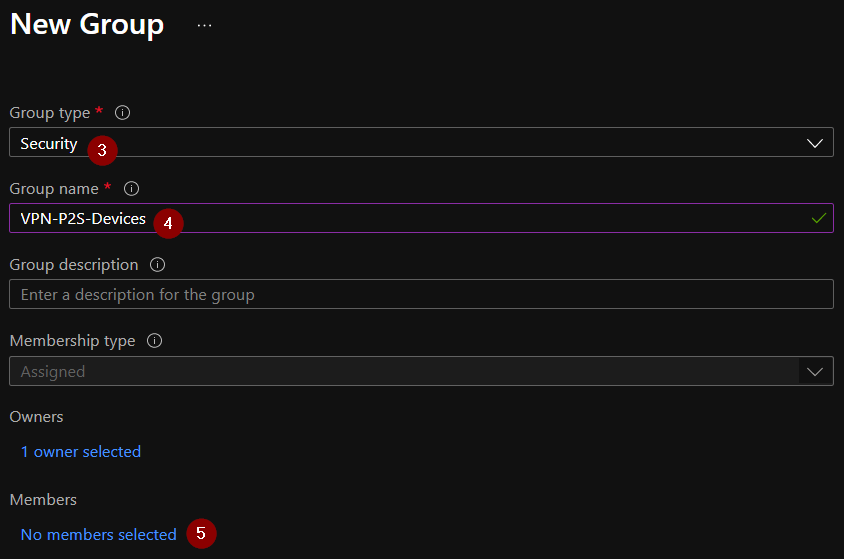
Create a security group in the Azure Active Directory (AAD). You can later add all devices to this group on which you want to have the VPN configured. If you already have a suitable group, you can skip the following steps and continue with the Intune Configuration Profiles.
- In Azure Active Directory navigate to «Groups».
- Click on "New Group"
- Keep «Group type» on «Security»
- Assign a suitable name.
- Do not assign any members for the time being.
- Click on "Create" to create the group.
You will use this group to assign Intune configuration profiles, which you will create below.
Intune Trusted Certificate Profile
This profile contains the public root certificate of your CA, which will be used to sign the client certificates later. Make sure you have this certificate before you continue.
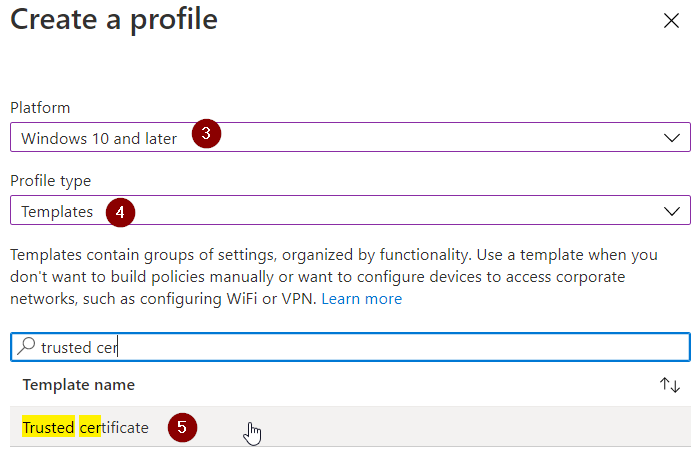
- Open Microsoft Intune and navigate to "Devices" >> "Configuration Profiles" (direct link).
- Click on "Create profile".
- Select "Windows 10 and later" as platform.
- Select "Templates" for the profile type.
- Search for "Trusted certificate" and select this template.
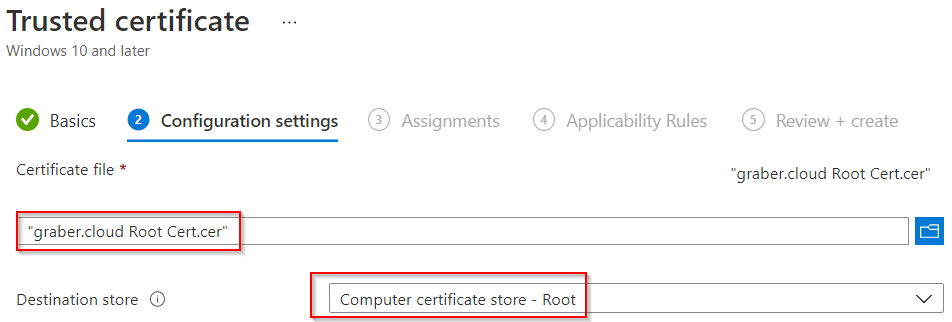
- Enter a name for the profile, e.g. "graber.cloud Root Cert". Click "Next".
- Upload the root certificate and select "Computer certificate store - Root" in the dropdown of "Destination store".
- Assign the profile to the previously created AAD group. In my case the group "VPN-P2S-Devices". Click "Next".
- You can leave the item "Applicability Rules" empty. Click "Next".
- Check the information in the summary. If they are correct, click on "Create" to create the profile.
Now proceed with the client certificate.
Client Certificate - SCEP Certificate Profile
This profile ensures that the client can request a certificate from your CA and that it is issued. For the configuration you need the SCEP server URL of your CA. Have this ready to continue with the following configuration.
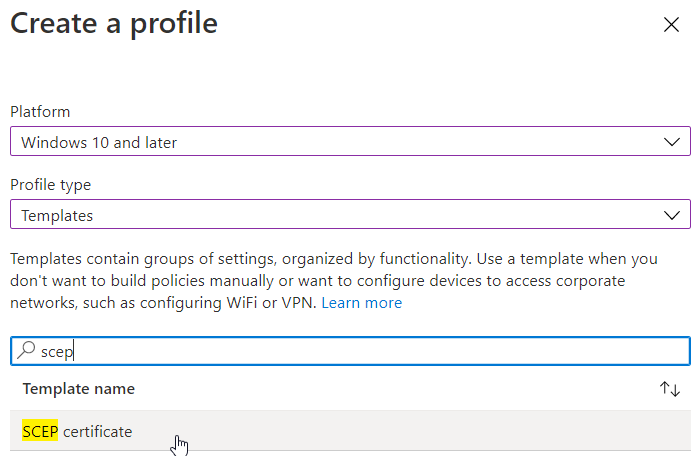
- Create another profile.
- Choose "Windows 10 and later" as Platform, search for the template "SCEP certificate" and select it. Confirm with "Create".
- Choose a Name and press "Next"
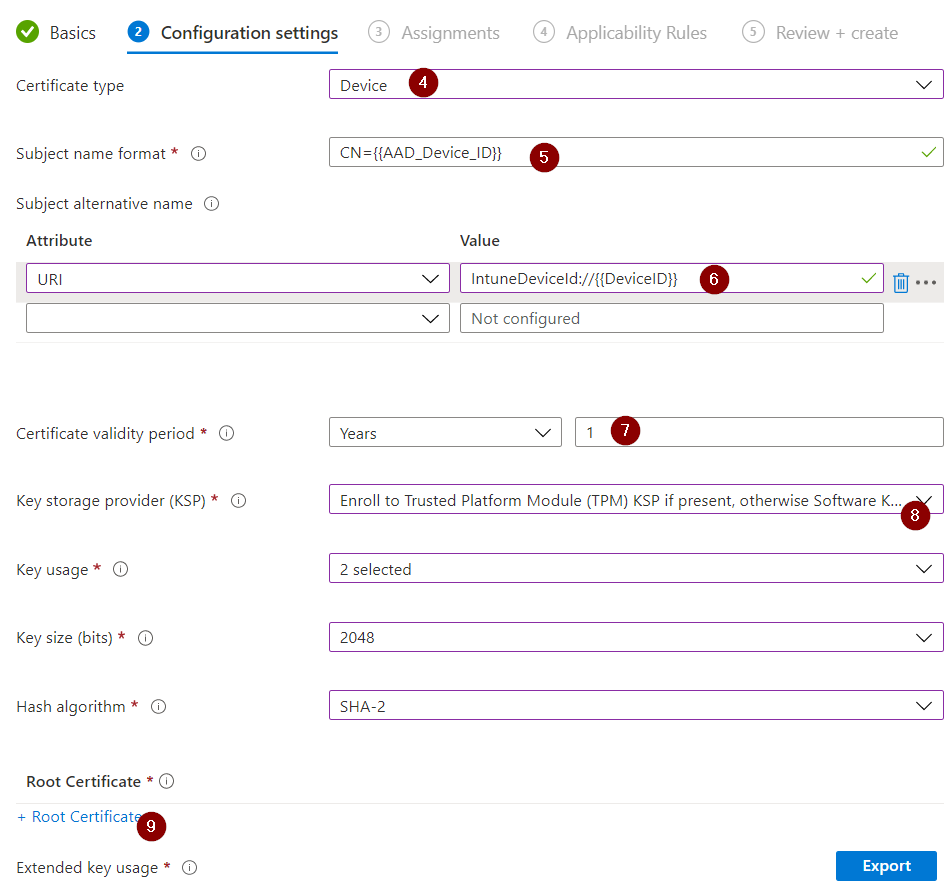
- Select "Device" as the "Certificate type".
- As "Subject name format" insert a suitable value for the automatic naming during certificate creation. I use the device ID of the AAD object for this. "CN={{AAD_Device_ID}}".
Note: Other possible values according to Microsoft are...
{{DeviceId}} – Intune Device ID
{{Device_Serial}}
{{Device_IMEI}}
{{SerialNumber}}
{{IMEINumber}}
{{WiFiMacAddress}}
{{IMEI}}
{{DeviceName}}
{{FullyQualifiedDomainName}} (For Windows and domain-joined devices only)
{{MEID}}
- As «Subject alternative name» I chose «IntuneDeviceId://{{DeviceID}}».
- Select the desired validity period for the certificates issued. I leave this at 1 year.
- Select the desired "Key storage provider (KSP)". For me, "Enroll to Trusted Platform Module (TPM) KSP if present, otherwise Software KSP" is most appropriate.
- As "Root Certificate" you select the previously configured "Trusted certificate profile". If you do not have any other "Trusted certificates", you can only select this one anyway.
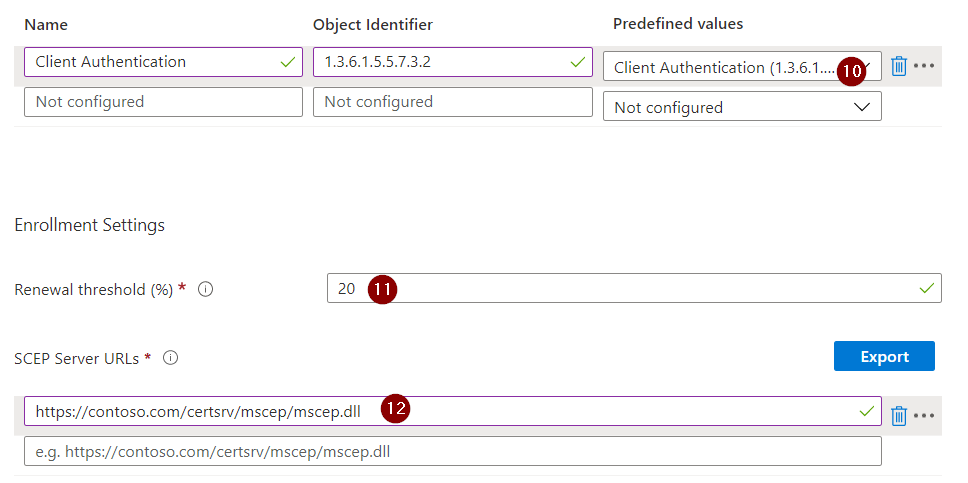
- On«Extended key usage» make sure to add «Client Authentication».
- Under the item "Renewal threshold (%)" you can now define from when a certificate renewal should be performed. I have kept the default value "20".
- Now add your "SCEP Server URLs". For example "https://contoso.com/certsrv/mscep/mscep.dll".
- Assign the just configured profile to the same group as you did with the "Trusted certificate profile". In my case this is the group "VPN-P2S-Devices".
- You can leave the item "Applicability Rules" empty. Click "Next".
- Check the information in the summary. If they are correct, click on "Create" to create the profile.
Now you have already created the two certificate profiles, both the trust for the root certificate and the issuance for the client certificates. The preparations for the VPN configuration are now complete.
Point to Site VPN Gateway Configuration
Before the VPN tunnel can be configured for the clients, you must first complete the VPN gateway configuration for the point-to-site connection. In the meantime, the gateway should have been successfully created.
- Navigate to the created "Azure VPN Gateway".
- Under «Settings» choose «Point-to-site configuration».
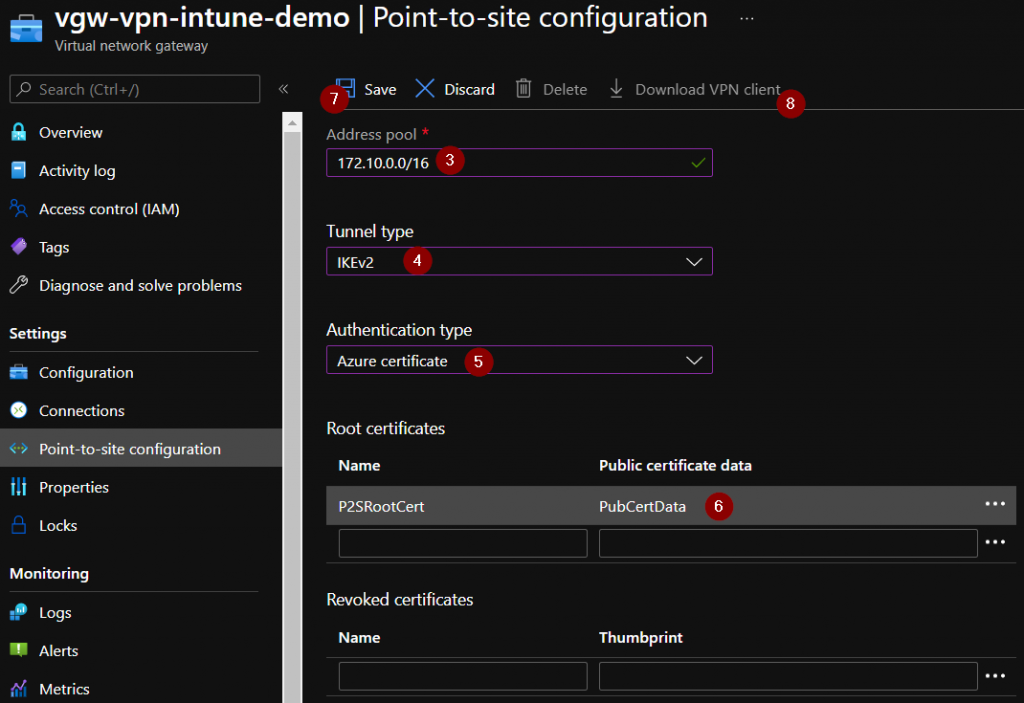
- Define the desired "address pool" for your clients that will connect via VPN. Make sure that you do not configure any network conflicts.
- At "Tunnel type" you choose the type you want. In my example I use "IKEv2".
Note: If you use a different tunnel type, this must also be taken into account in the Intune VPN profile configuration.
- At «Authentication type» choose «Azure certificate».
- Now you define a name and insert the "Public Key" of the root certificate.
- Click on "Save" to save the configuration.
- Now select "Download VPN client" and download the ZIP file.
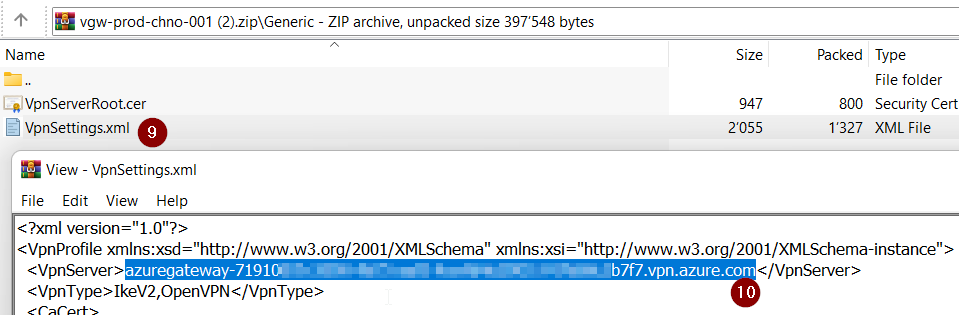
- Open the ZIP file and open «VpnSettings.xml» in folder «Generic».
- Copy the "VpnServer" address. You will need this later.
Your Azure VPN gateway is now fully configured for the point-to-site VPN. Now you configure the opposite side, the clients, using Intune.
Intune VPN Profile
This profile is responsible for configuring the VPN tunnel on the Windows 10 device. In order to configure it, you must have completed the previous configurations.
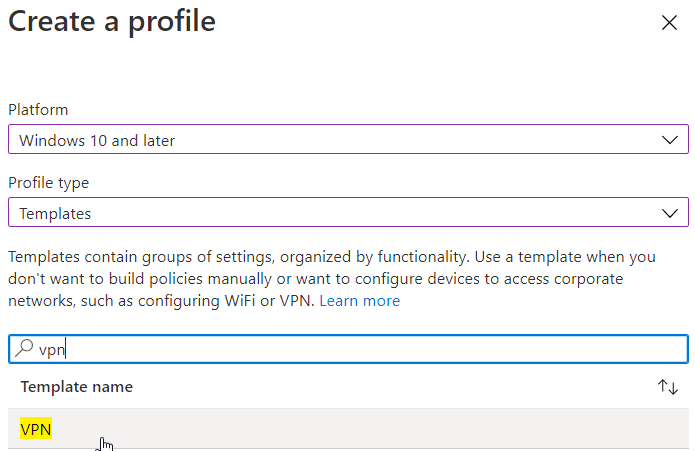
- Create another profile via "Create profile".
- Choose "Windows 10 and later" as Platform, search for the template "VPN" and select it. Confirm with "Create".
- Choose a Name and press "Next"
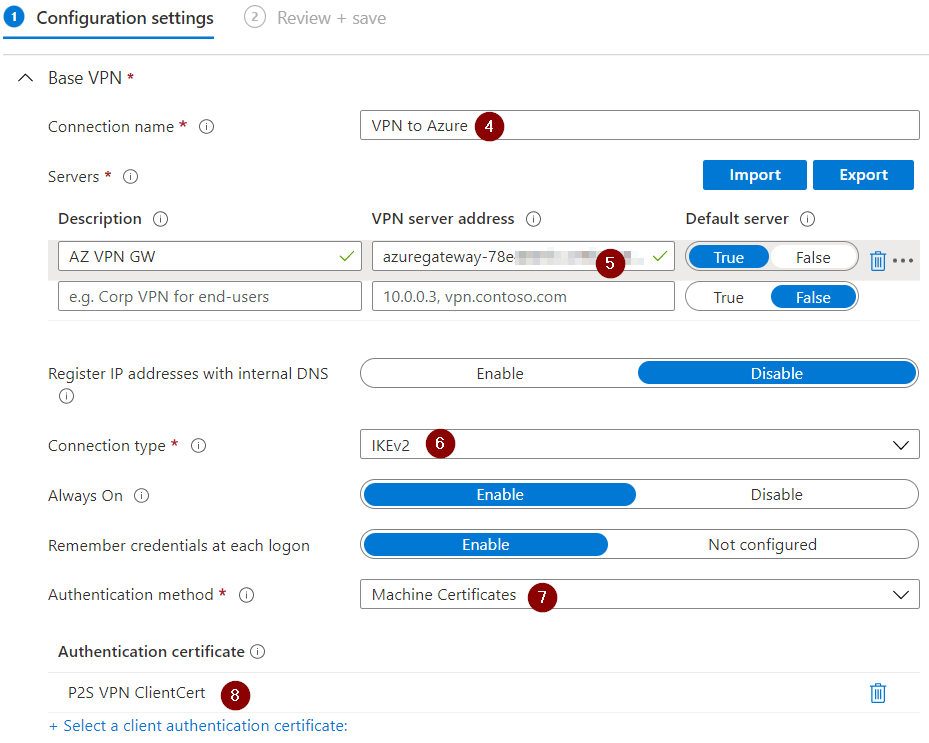
- Under "Base VPN" you define the "Connection name", with which the VPN then appears on the clients.
- For "VPN server address" add the address of the Azure VPN gateway you copied from the XML file in the "Point to Site VPN Gateway Configuration".
- Under "Connection type" you now select "IKEv2" (must match the configuration of the Azure VPN gateway).
- For «Authentication method» choose «Machine Certificates».
- Now select the previously configured "SCEP certificate".
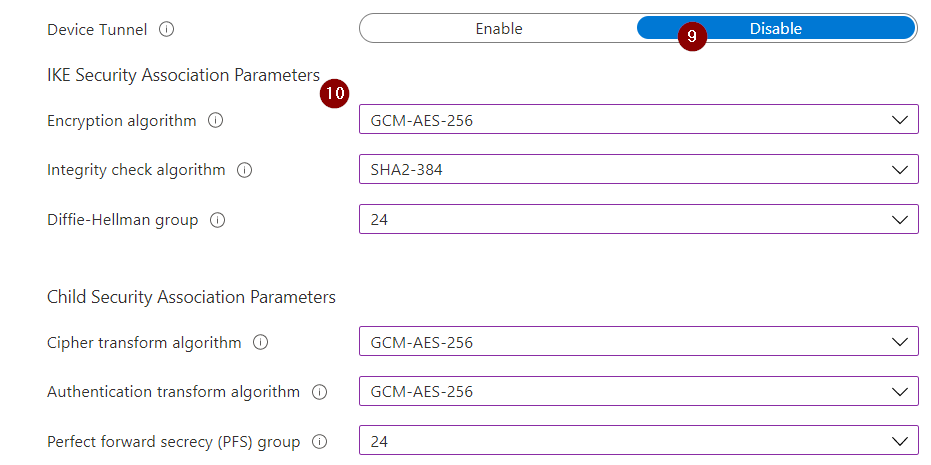
- Now define whether you want a "Device Tunnel" or not. Since a Device Tunnel is only possible with Windows 10 Enterprise, I have set this option to "Disable" in my example.
- If desired, you can now define your "IKE Security Association Parameters" & "Child Security Association Parameters" to adjust the security to your standards.
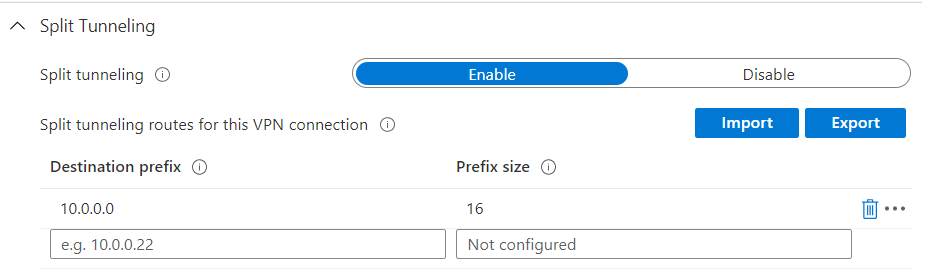
- Under "Split Tunneling" I set the value "Enable" to get a split tunnel, and define the routes I want...
Note: There are countless other settings that you can make in the VPN profile. However, depending on your environment, these are not absolutely necessary for a functioning setup and are therefore not considered further in this guide.
- Assign the just configured profile to the same group as you did with the two certificate profiles. In my case this is the group "VPN-P2S-Devices".
- You can leave the item "Applicability Rules" empty. Click "Next".
- Check the information in the summary. If they are correct, click on "Create" to create the profile.
Finalization and device control
Now you have created all the profiles you need. Since these profiles are all assigned to the same Azure AD group, you can now easily manage the certificate and VPN configuration via this group. So now just add all the devices to the group on which you want to configure the certificate based point to site VPN through Intune.
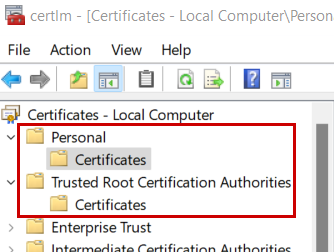
On the client you will then find the root certificate in the computer certificates under "Trusted Root Certification Authorities" and the client certificate under "Personal".
If this is the case and you have configured the VPN correctly, you should now see that the VPN is connected.
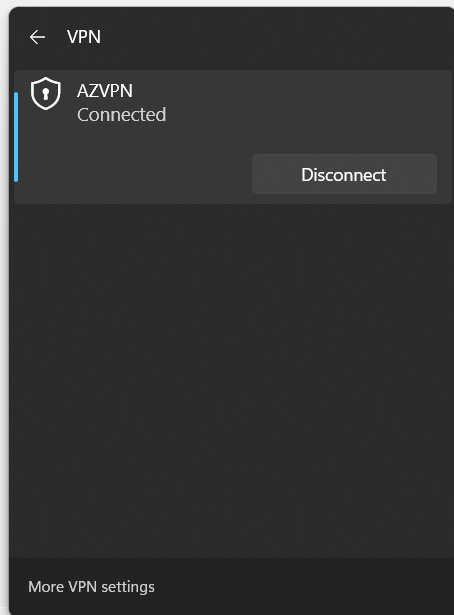
You have successfully rolled out a certificate-based Point to Site Azure VPN via Intune without touching the Windows 10 devices.
Sources:


Great post. Quick question, What are the OS requirement for the endpoints? Windows 10 and up? Enterprise or Pro?
Thanks.
Les
Appreciate your question.
I did this with a Windows 10 Pro, as well as Windows 11 Pro. While not tested nor recommended, it should even work with Win 10 Home.
Hi Yannic,
Thanks for the instructions.
I was wondering what product/solution you used for the CA(aaS).
Regards
Victor
Hello Victor
Thank you for your message.
We are partnering with SCEPman, but there are several possible solutions on the market.
https://www.scepman.com/
Hope that helps.
Best, Yannic
Hi Yannic
Thanks for your instructions and recommendations.
I’d like to ask you which product/solution you are using for the CA(aaS).
Regards
Great blog post, I was curious is this article based upon endpoints being joined to Azure AD natively and not hybrid AD joined?
Also, in regards to uploading the Public key of the rootca cert, I think this means just opening up the .cer file in notepad and pasting in the contents?
Many thanks,
Alex.
Hello Alex, thank you very much for your comment.
This architecture is designed with Azure AD joined endpoints. It doesn’t really matter if the devices are hybrid joined or AAD joined only. I configured both already 😉
It’s mostly about the network itself where you have to take care of. Things like split tunneling and such, but this is non-related to the join scenarios.
About the certificate, you’re right, sir. Just open the .cer and copy + paste the key.
Hope this does help you further and thx for commenting.